
Drilling method and progress
Record the drilling method, penetration resistance, water return, progress readings and standpipe installations of a borehole in Borehole Logging.
Applies toWindows and macOSWeb browser
These tables record how the hole was drilled. The log sheet prints them in the narrow columns at the left of the sheet. All of them are in the Hole construction group, except Progress & water levels, which is in the Monitoring group.
Boring methods
- Open the hole's Boring methods table.
- Type the Top and the Base of each method.
- In Code, type the method code. The Method name fills in from the code.
| Code | Method |
|---|---|
| ADT | Auger drilling |
| AD/T | Auger drilling, TC bit |
| AD/V | Auger drilling, V bit |
| SFA | Solid flight auger |
| HA | Hand auger |
| WB | Washbore |
| NMLC, HMLC | NMLC or HMLC rock coring |
| HQ, NQ, PQ | Wireline coring |
| HQ3, NQ3, PQ3 | Triple tube coring |
| EXC | Excavator |
- Optional: type the Diameter (mm), the depth of the casing in Casing to (m) and the Equipment.
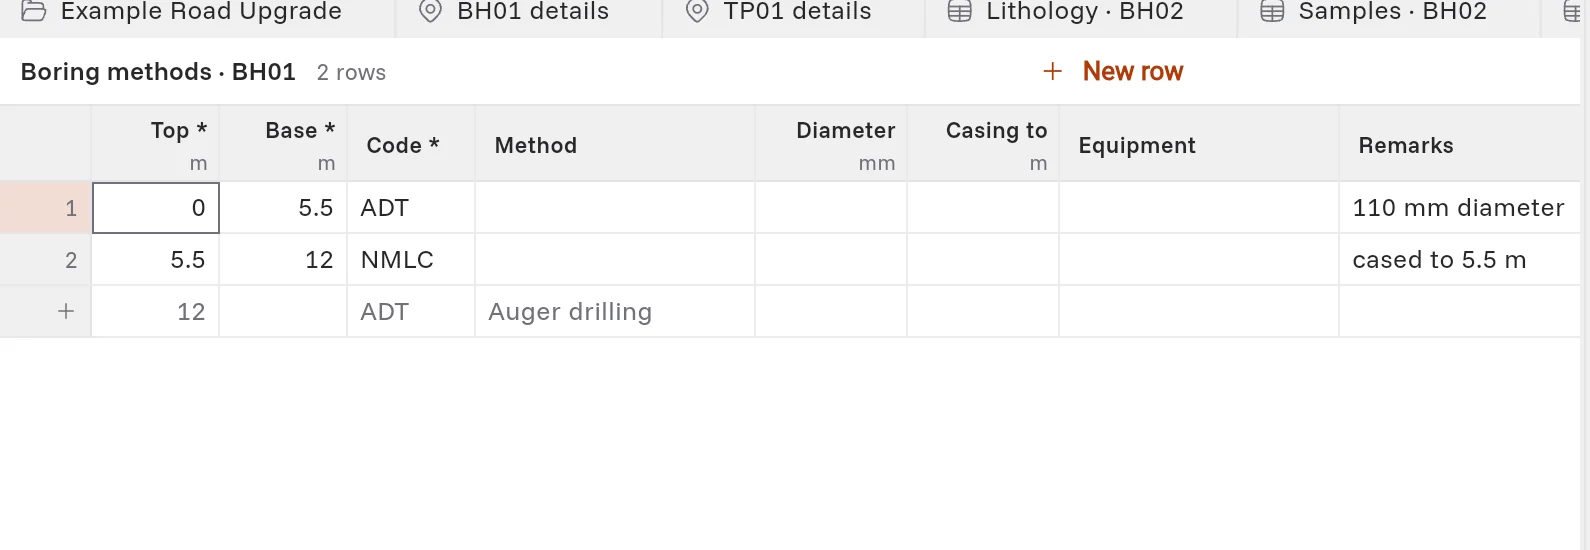
The top of a coring method is where the cored part of the log starts. For example, the soil sheet of BH01 prints ADT to 5.5 m, and the cored sheet prints NMLC below 5.5 m.
Penetration resistance
Record how hard it was to drill, as felt at the rig.
- Open the Penetration resistance table.
- Type the Top, the Base and the Resistance: VL, L, M, H, VH or R (refusal), or a range, for example M-H.
- Type - when the resistance was not assessed. The log sheet prints a dash.
Water return
While coring, record how much of the drilling water came back up the hole.
- Open the Water return table.
- Type the Top, the Base and the Return in percent.
- Optional: in Note, select partial loss or total loss.
Bands next to each other with the same return print as one label.
Progress & water levels
Record the depth of the hole, the casing and the water at the start and the end of each shift.
- Open the Progress & water levels table, in the Monitoring group.
- In Date and time, type the date and time of the reading, for example 14/09/2026 07:00.
- In Shift, select start or end.
- Type the Hole depth, the Casing depth and the Water depth in metres.
Installations
Record a standpipe or a piezometer, from the top down.
- Open the Installations table.
- For each part, type the Top and the Base, then select the Component: surface seal, casing, blank pipe, screen, sand pack, bentonite, grout, backfill, sump or other.
- Select the Legend that the log sheet draws for the part.